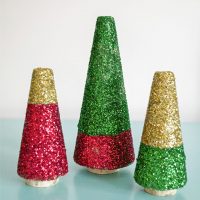
DIY Color Block Glitter Christmas Trees
Easy DIY Color Block Glitter Christmas Trees are a fun, modern take on classic glitter tree decor! Just a few supplies are needed that you can find at your local craft store to make this festive Christmas DIY!
Print
Pin
Servings: 3 trees
Cost: $20
Equipment
- foam brush
- hot glue gun
- hot glue sticks
Supplies
- 3 craft styrofoam cones
- red glitter
- green glitter
- gold glitter
- Mod Podge
- painters tape or aluminum foil
- 3 birch rounds
Instructions
- Line your workspace with a drop cloth or newspaper.
- Tape off or form foil over the part of the styrofoam cone that you do not want to glitter first. I used foil which worked quite well and then trimmed off any excess with my x-acto knife for a straight edge.
- Brush mod podge on the portion of the cone that you want to glitter. Then pour the desired glitter color over the cone until completely covered. Set aside to dry completely. Repeat with remaining cones. Once each cone has dried, take off the tape or foil.
- Brush the remaining part of each cone with the mod podge and pour a different color glitter over the cone to contrast the other half of the cone. I did not really measure where I wanted my two colors to start/end. I just basically wanted then to be 1/3 one color, 2/3 another color. However, you can use a ruler if you would like.
- Set the cones aside to dry completely. Once the cones have dried, cover the birch rounds with hot glue and attach to the bottom immediately. You want to make sure you have at least half inch around the birch rounds to the edge of the Christmas tree to have enough contrast in size.
- Allow the hot glue to dry for a few minutes.